Repeat for the top.

With the camera selected, in the Channel Box Editor you can change the alpha level of the image under INPUTS_imagePlane_Alpha Gain. I used .5

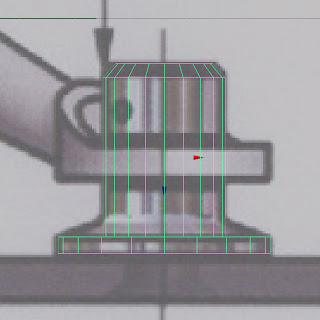
From the side view we will start with the bolt. CREATE_POLYGON PRIMITIVE_CYLINDER. Rotate X by 90, use a radius of 1.1, and move the object into place until it aligns with the image. It isn’t important that ours is the same, but I have 7.6 for Translate X, and 2.5 for translate Z.

Select the top cap of the cylinder in face mode and move it up until it aligns with the top of the bolt, just under the chamfer. Then EDIT MESH_EXTRUDE the face up and scale it in matching the image (use the uniform scale of the extrude gizmo by clicking one of the boxes at the end of the arrows, then select and drag the scale box at the center). For the bottom cap, EDIT MESH_EXTRUDE the cap out using the uniform scale, and extrude again to the bottom of the flange.
Go into perspective view to work on the radius of the bolt. If you want to toggle either of the image planes off in this view, select the camera from the outliner, go into the attribute editor (ctrl a), go to the third tab called ImagePlane and under IMAGE PLANE ATTRIBUTES toggle DISPLAY to LOOKING THROUGH CAMERA.
To begin we will offset some edges EDIT MESH_OFFSET EDGE LOOP TOOL. Select the edge of the flange and drag. Get back into object mode and in the Channel Box Editor we can change the OFFSET amount, and the SPLIT TYPE to ABSOLUTE.

Go into SubD approximation mode by pressing 2. Using SELECT_SELECT EDGE LOOP TOOL double click one of the edges on the bottom of the flange, and double click the loops at the top that define our chamfer.

Then go to EDIT MESH_CREASE TOOL. Drag the mmb (middle mouse button) until the value reads 2. Move the edges around until the geometry matches the image of the bolt. Here is a view of my bolt in the 3 hotkey view.

No comments:
Post a Comment